If you are a new user then I recommend you to use Basic Setup View because these are the main settings and once you setup that you are AMP is ready.
So you just finished installing AMP for WP and now you are wondering what to do?
Then, this is the perfect guide to help you to set up AMP on your Website.
Here are the 9 actionable steps that will take you through the essential settings required for AMP. It will also help you understand the basics of AMP.
If your website has a logo, if you want to Show your website logo in AMP version of your site, then you can Upload LOGO from here.
Click on Design and Presentation then you need to click on Set Up button link like below the screenshot.
In this “Setup Your Logo” option you can Setup Logo Click on the Add Logo button Choose Logo from your System Library and Click on Upload Logo.
Now your logo is successfully added on your Website.
To Enable AMP on Pages,then you need to click on Change link like below the screenshot.
In this option you can select where do you need AMP just you need to check this option on this page AMP will be display.
If your Website has a static front page, if you want to show static front page on AMP version of your site, then kindly follow the below given steps.
In this option Where do you need AMP? option you can setup front page for this click on Change link like below the screenshot.
In this where do you need AMP? option you can chek Homepage option. By default, AMP shows your website Latest Posts. If you want to Show Static Front Page on your AMP site Homepage, then Check Do you use Custom Front Page? option.
If you want to add advertisement then you need to click on the View Setup link like below the screenshot.
In the Advertisement section, we provide users to place Ad in 6 possible places. These are free Ads option you can display your ads in 6 places.
Enable the Ad of your preferred position and add the “AD Size”, “Data AD Client” and “Data AD Slot” given by Adsense.
If you want to config analytics tracking then you need to click on Config button like below the screenshot.
In Analytics Type Option you can use Google Analytics or any other Analytics as per your requirement.
Google Analytics: First enable the Google Analytics option and Enter the Analytics ID.
If you want to set up 3rd Party Compatibility like Yoast, All in one seo etc then click on the View List link and select your plugins like below the screenshot.
In this option, User can select SEO Plugin.
Currently we compatibility with Nine SEO Plugin:
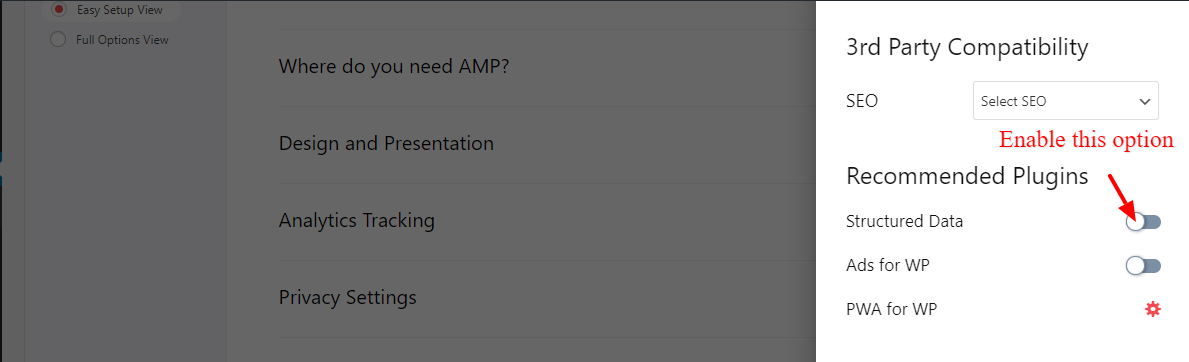
If you want to set up Structured Data plugin in this 3rd Party Compatibility click on the View List link and select your plugins like below the screenshot.
If you want to set up 3rd Party Compatibility like Yoast, All in one seo etc then click on the View List link and select your plugins like below the screenshot.
Enable this Structred data option it will install Schema & Structured Data you can setup you schema by using this plugin.
In order to improve the Appearance of AMP version of your site, we have Designed Four templates. You can Choose them from the Design Settings.
It is recommended to create a Custom Menu for AMP. From this page, you can create Custom AMP menu. If you don’t want Custom Menu for AMP, you can use the default menu.
It is a beginner tutorial to Get Started for AMP. If you need more information on How to setup AMP, you can refer to this page > AMP Tutorials
That’s it for this tutorial!
We hope it helped you. If you have any feedback or questions, then please share them in the comments section below.
If you want to add an AWeber form in AMP then first you need to…
Webpushr is the fastest growing web push notifications platform that marketers love & developers rely…
Follow these steps to add Adobe Analytics in AMP Step 1: Go to WordPress Admin Area -> AMP…
Core Web Vitals are the subset of Web Vitals that apply to all web pages,…
The following reasons can be shown for non-indexing. Server error (5xx) Your server returned a 500-level…
We have added the Google Analytics 4 ( GA 4 ) integration in AMPforWP v1.0.80.…