
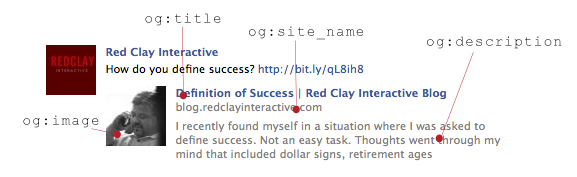
Open graph meta tags allow you to control what content shows up when a page is shared on Facebook. We’ve all seen posts like these on Facebook.
To enable the Open Graph meta tags in AMP you need to go to WordPress Dashboard -> AMP Option Panel -> Settings -> SEO -> Enable “OpenGraph Meta Tags” and then click on the “Save Changes” button.

In the source code, OpenGraph Meta Tags markup will be added like below the screenshot.

Below are the most common Open Graph tags you will encounter with a brief description of each.
- og:title – The title of your page, content, object etc. as you would like for it to appear when displayed on Facebook.
- og:site_name – the name of your site.
- og:description – Perhaps the most important tag. This is the 1-2 sentence snippet that shows up in the post. Write this carefully as this can be the difference between getting clicks or not.
- og:type – The type of content. Think of these as categories, hotel, blog, article etc.
- og:image – The URL for an image you want to represent the your content. Images must be either PNG, JPEG and GIF formats and at least 50px by 50px.
- og:url – This will be the URL that will be associated with your content ie the link.
That’s it for this tutorial!!!
We hope it helped you. If you have any feedback or questions, then please share them in the comments section below.