How to install Advanced AMP Ads Plugin Extension

After installing & activating both AMP & AMP for WP plugins, you have to Upload one more extension Named “ Advance AMP Ads ” Extension, in order to use Link Ads, In content Ads, other Sticky Ads on your website. You can also place Third Party Ads using Advance AMP Ads.

Here are few simple steps to place Link Ads in AMP using Advance AMP Ads Extension

After downloading Advance AMP Ads on your Desktop follow the below given steps.

1. Go to Plugins > Add New then click on Upload Plugin.

2. Advanced AMP Ads is a Paid Plugin Extension . You won’t find that extension in WordPress Plugin directory. So you have to upload this plugin after purchasing.

  • Click on Upload Plugin
  • then choose ” Advance AMP Ads ” Extension from which you already downloaded after purchasing.
  • After that, Click on Install Now

3. After Uploading the plugin, Click on Activate Plugin

4. After Activating the Extension Plugin, Go to AMP option panel –>Advanced AMP Ads.

you can see we have added Global, In content Ads, and General Options Ads Options in this Extension plugin. Enable options according to your requirement. After that click on the save changes button.

 Global and Incontent Ads: 

General  Options:

  • Ad after Featured Image: Once you enable this option select Doubleclick in advertisement type and enter the data slot then it will show ad after feature image.
  • Below the Header (SiteWide): Once you enable this option select Doubleclick in advertisement type and enter the data slot then it will show ad below the header.
  • Below the Footer (SiteWide): Once you enable this option select Doubleclick in advertisement type and enter the data slot then it will show ad below the footer.
  • Above the Footer (SiteWide): Once you enable this option select Doubleclick in advertisement type and enter the data slot then it will show ad above the footer.
  • Above the Post Content (Single Post): Once you enable this option select Doubleclick in advertisement type and enter the data slot then it will show ad above the post content.
  • Below the Post Content (Single Post): Once you enable this option select Doubleclick in advertisement type and enter the data slot then it will show ad below the post content.
  • Below the Title (Single Post): Once you enable this option select Doubleclick in advertisement type and enter the data slot then it will show ad below the title.
  • Above Related Posts (Single Post): Once you enable this option select Doubleclick in advertisement type and enter the data slot then it will show ad above related posts.
  • Below the Author Box (Single Post): Once you enable this option select Doubleclick in advertisement type and enter the data slot then it will show ad below the author box. This option will only be available in swift design only (Works from 0.9.97.10 and Above)
  • Ads Inbetween Loop: Once you enable this option select Doubleclick in advertisement type and enter the data slot then it will show ad in-between loop. (Works only with 0.9.68 or higher version of the ampforwp core)

Scroll down a little to see this option

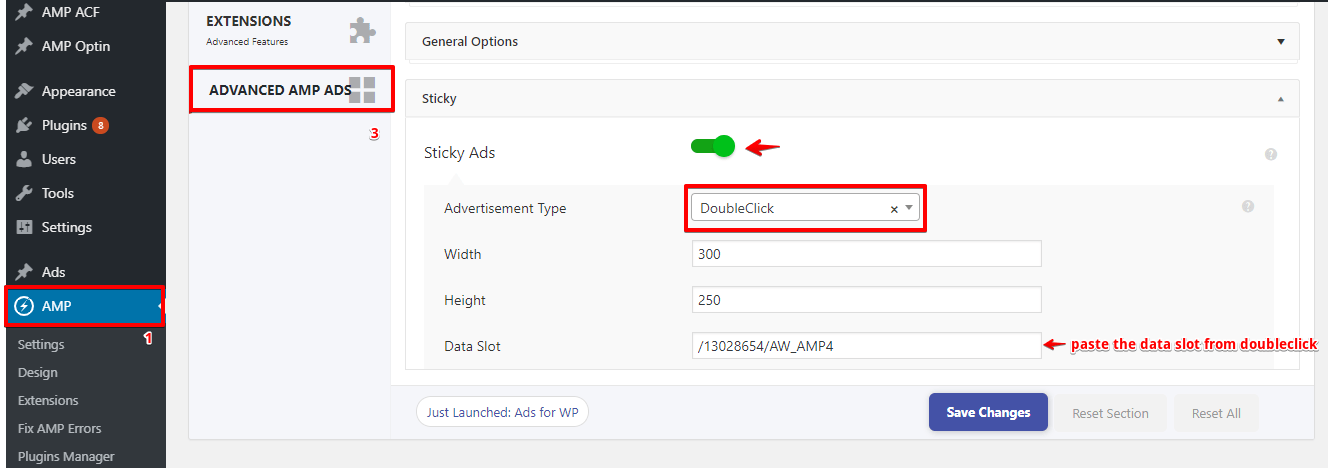
Sticky ad:

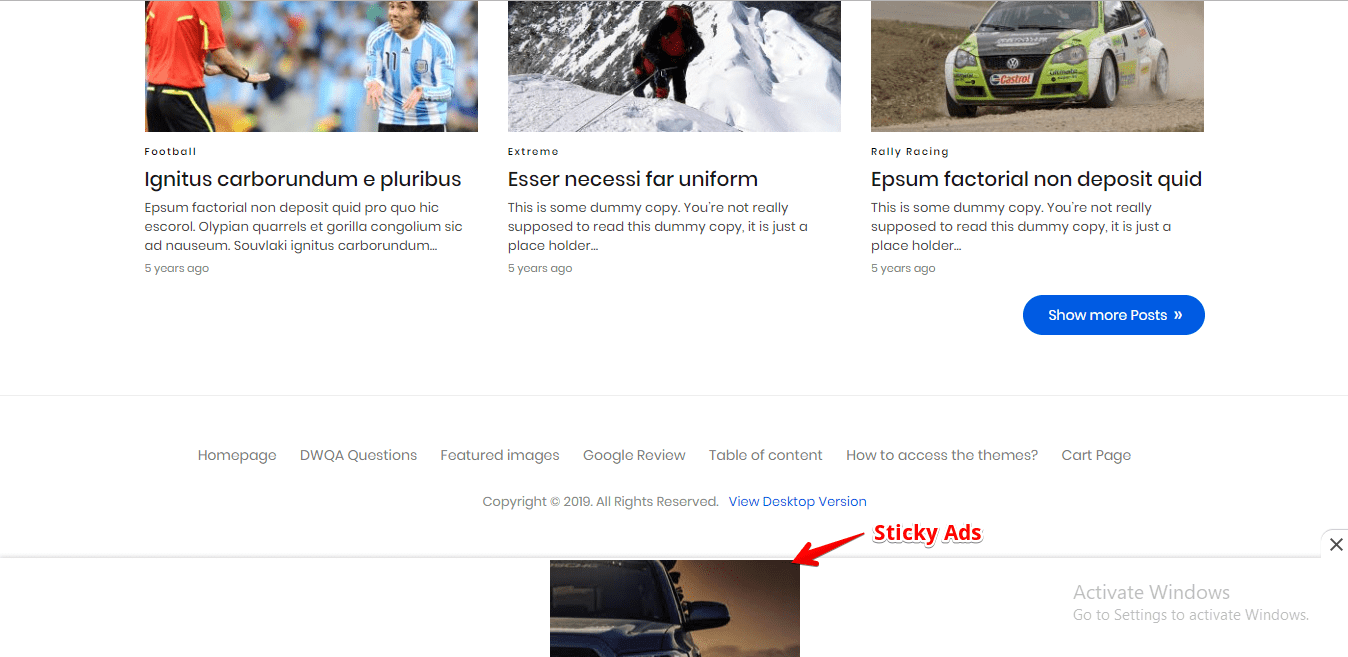
Sticky Ads: Once you enable this option select Doubleclick in advertisement type and enter the data slot then it will show the sticky ad at the bottom of the screen then enable this option and enter the data.

The Output of the Sticky Ads in AMP

Now that you have installed the plugin, here are some important articles for you to have a look:

  1. Adding Adsense Ads in AMP
  2. Link Ads
  3. DoubleClick ADs in AMP
  4. Media.net ADS in AMP
  5. Taboola ADS in AMP
  6. Add Any other AD network with Custom Ad feature.

That’s it for this tutorial!

We hope it helped you. If you have any feedback or questions, then please share them in the comments section below.

Share
Published by
Ahmed Kaludi

How to create an AWeber form in AMP

If you want to add an AWeber form in AMP then first you need to…

3 years ago

How to setup webpushr notification in AMP

Webpushr is the fastest growing web push notifications platform that marketers love & developers rely…

3 years ago

How to add Adobe Analytics in AMP

Follow these steps to add Adobe Analytics in AMP Step 1: Go to WordPress Admin Area -> AMP…

3 years ago

What is the CWV plugin all about

Core Web Vitals are the subset of Web Vitals that apply to all web pages,…

4 years ago

How to fix “Alternate page with proper canonical tag” Page Index issue in Google Search Console

The following reasons can be shown for non-indexing. Server error (5xx) Your server returned a 500-level…

4 years ago

Google Analytics ( GA4 ) integration in AMPforWP

We have added the Google Analytics 4 ( GA 4 ) integration in AMPforWP v1.0.80.…

4 years ago