There is no need to mention why Adsense in important in websites. In the previous post, we have discussed on How to Activate AMP on WordPress site, Google Analytic for AMP and Customizing AMP, Many bloggers asking for How to add advertisements in the middle of the content in AMP version of the article post, So we come up with new ADVANCED AMP ADS extension to the Accelerated Mobile Pages Plugin. Now you can display Adsense ads in between the post content and Sticky Ad in the bottom of the screen.
Have a look at the screenshots of Ads placed in AMP version of the website.
Click Here to Purchase the Add-On for Accelerated Mobile Pages Plugin Worth $29.99
Click on Purchase –> Fill-In Billing Details –> Click Place Order –> Complete the payment by Debit / Credit Card.
After Successful Payment, Click Here to Download Add-On for Accelerated Mobile Pages Plugin from My Downloads Page.
Note: FileZilla FTP Client Required is to Activate the Add-On or Login to CPanel –> File manager
OR
Login to WordPress Admin panel –> Plugins –> Click on Activate Advanced AMP Ads
Note: Selecting Responsive Ad size is recommended for Sticky Ad.
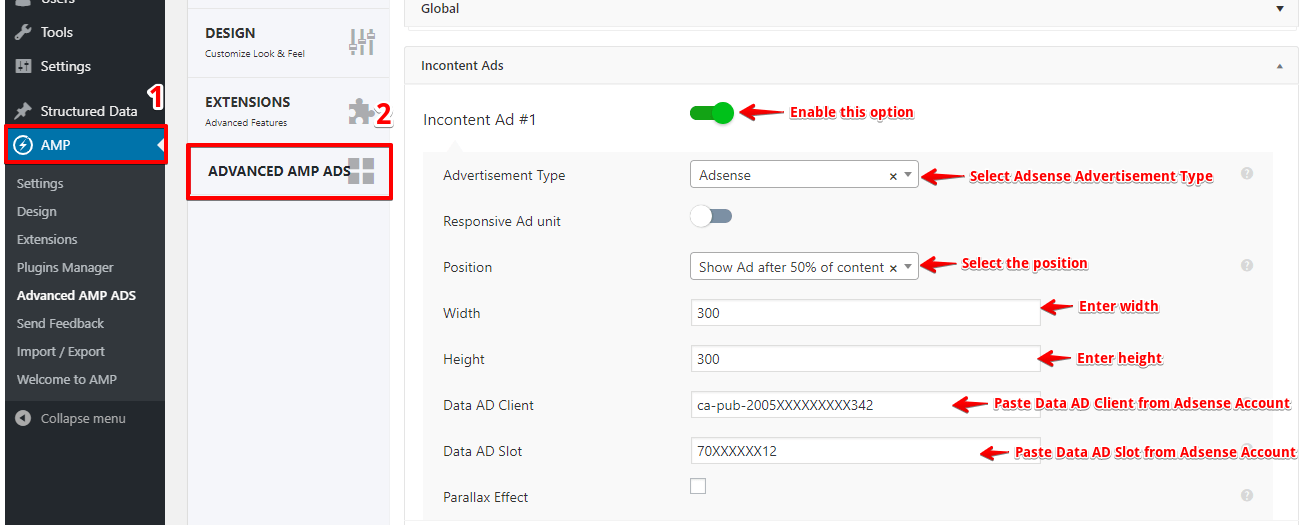
If you select Adsense option from Advertisement type below the option will appear like below the screenshot.
AMP is the most powerful and great innovation by Google, Integrating Adsense in AMP will stabilize your earnings without affecting user experience. There is much work ahead and more future updates on the way to bring more benefits to users and publishers.
That’s it for this tutorial!
We hope it helped you. If you have any feedback or questions, then please share them in the comments section below.
If you want to add an AWeber form in AMP then first you need to…
Webpushr is the fastest growing web push notifications platform that marketers love & developers rely…
Follow these steps to add Adobe Analytics in AMP Step 1: Go to WordPress Admin Area -> AMP…
Core Web Vitals are the subset of Web Vitals that apply to all web pages,…
The following reasons can be shown for non-indexing. Server error (5xx) Your server returned a 500-level…
We have added the Google Analytics 4 ( GA 4 ) integration in AMPforWP v1.0.80.…