We hope it helped you. If you have any feedback or questions, then please share them in the comments section below.
In this tutorial, we’ll be seeing the setup of our revolutionary plugin “AMP Cache“.
Here are the steps :
For more details how to upload extension click on this link Upload and Install.
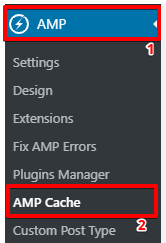
Step 1: First, Go to the WordPress admin area -> Click on AMP option panel -> AMP Cache.
Step 2: Enable AMP Cache option and Save the changes, which will start caching your AMP and makes your site to load AMP with lightning fast speed.
This would complete your setup for the AMP Cache.
Auto clear cache? : Once you enable this option it will automatically clear the cache.
Set the Time Internal: In this field, you can Set the Time internal it will clear cache automatically. In this field, you need to enter the Hours in numerics (eg: 12) no need to add AM/PM.
Clear Cache: Using a checkbox below the AMP Cache option from where you can manually clear the cache
this will clear the cache of AMP.
Note: If you’ve made any changes in the AMPforWP Core settings then you need to clear the cache for AMP which then reflects the changes immediately.
Remember:
You won’t be able to see the caching when you’ll be logged in to your WordPress account, you need to see either in Incognito mode of your browser or log out of your site.
That’s it for this tutorial!
We hope it helped you. If you have any feedback or questions, then please share them in the comments section below.
Follow these steps to add Adobe Analytics in AMP Step 1: Go to WordPress Admin Area -> AMP…
Core Web Vitals are the subset of Web Vitals that apply to all web pages,…
The following reasons can be shown for non-indexing. Server error (5xx) Your server returned a 500-level…
We have added the Google Analytics 4 ( GA 4 ) integration in AMPforWP v1.0.80.…
In this article, I will show you how to add Dotmetrics Analytics to your AMP…
In this option, we will show you how to modify the H1-H6 size for mobile…