


We hope it helped you. If you have any feedback or questions, then please share them in the comments section below.
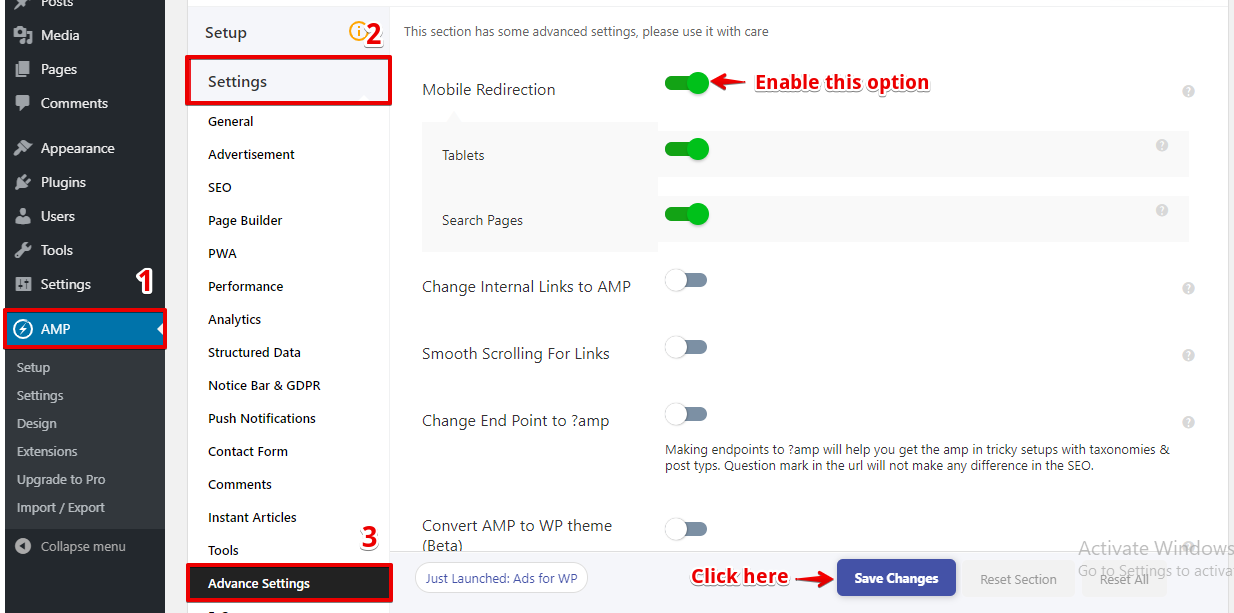
In order to redirect all mobile visitors to the AMP version of your site, you need to Enable an option called Mobile Redirection.
Follow the steps below to Redirect All mobile visitors to AMP:
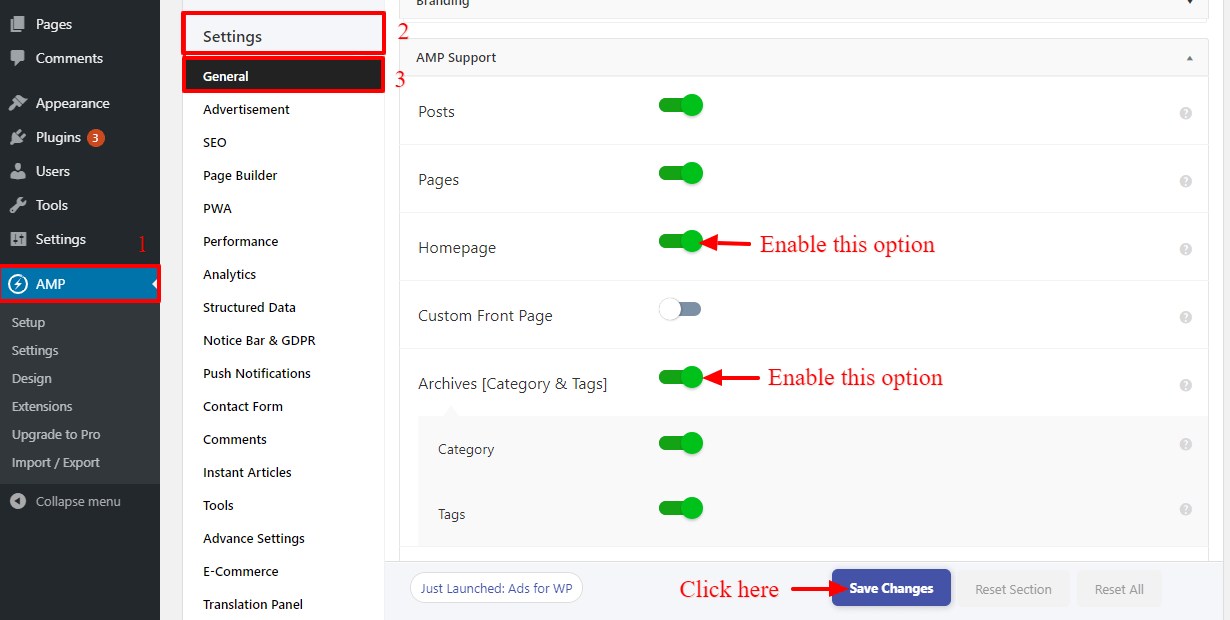
Make sure you also enable
Above the two option you will find in the WordPress Dashboard -> AMP -> Settings -> General -> Once you enable “Homepage” and “Archives[Category & Tags]” option inside “Category” and “Tags” option will be display and then click on the “Save Changes” button.
This way you can redirect all mobile visitors to AMP version of your website.
First of all, you need to separate cache file for the Mobile device and Desktop device.
Separate cache files for mobile devices and desktop in case you use one of the plugins mentioned below.
Once your site is loads mobile device or Desktop device it will serve a separate cache file for the different device.
Does Not support the Mobile redirection.
Breeze Cache does not allow mobile redirection functionality due to this it will not work in AMP. If you really need mobile redirection feature in amp then you have to disable breeze cache
Cloudflare install in the server-side because of that reason it works on the high property and it does not allow mobile redirection and it will server the desktop version only. So please keep in mind that if you want mobile redirection then you need to disable Cloudflare and you cannot have both Cloudflare caching and mobile redirection at a time.
Note: Above this plugin does not support mobile cache.
If you have an issue regarding with the above plugin for Mobile redirection then Please leave your comments below.
Once you install WP Rocket plugin and activated then follow these steps:
1. Go to WordPress Admin Area -> Settings -> WP Rocket -> Cache -> Mobile Cache.
2. Enable caching for mobile devices: First, you have to select this option then it will show Separate cache files for mobile devices option.
3. Separate cache files for mobile devices: Once you select this option WP Rocket will create separate cache file for mobile devices.
4. Click on the save change button.
Once you install WP Super Cache plugin and activated then follow these steps:
1. Go to WordPress Admin Area -> Settings ->WP Super Cache ->Click the Advanced tab.
4. By default, you should see the Mobile Device Support checkbox checked. If not, check the checkbox and Save the changes.
5. Purge WP Super Cache’s cache
Once you install W3 Total Cache plugin and activated then follow these steps:
1. Once installing W3 Total Cache plugin you will see the Performance option in WordPress dashboard.
2. Go to WordPress dashboard -> Performance ->User Agent Groups ->Enable this option in the phone and click on the save button.
Once you install Litespeed cache plugin and activated then follow these steps:
1. Once installing Litespeed cache plugin you will see the Litespeed cache option in WordPress dashboard.
2. Go to the LiteSpeed Cache plugin’s -> Settings -> Click on the “Cache” tab
Scroll down a little to see this option
3. Enable the “Cache Mobile” settings click on the “Save Changes” button.
4. Purge LiteSpeed Cache’s cache
Once you install WP Fastest Cache plugin and activated then follow these steps:
1. Once installing WP Fastest Cache plugin you will see the WP Fastest Cache option in WordPress dashboard.
2. Go to the Go to WordPress Admin Area -> WP Fastest Cache -> Settings > Check “Mobile” Option > after that click on the “Submit” button.
3. Purge WP Fastest Cache’s cache
Once you install and activated SG optimizer plugin mobile redirection will work perfectly no need to configure anything.
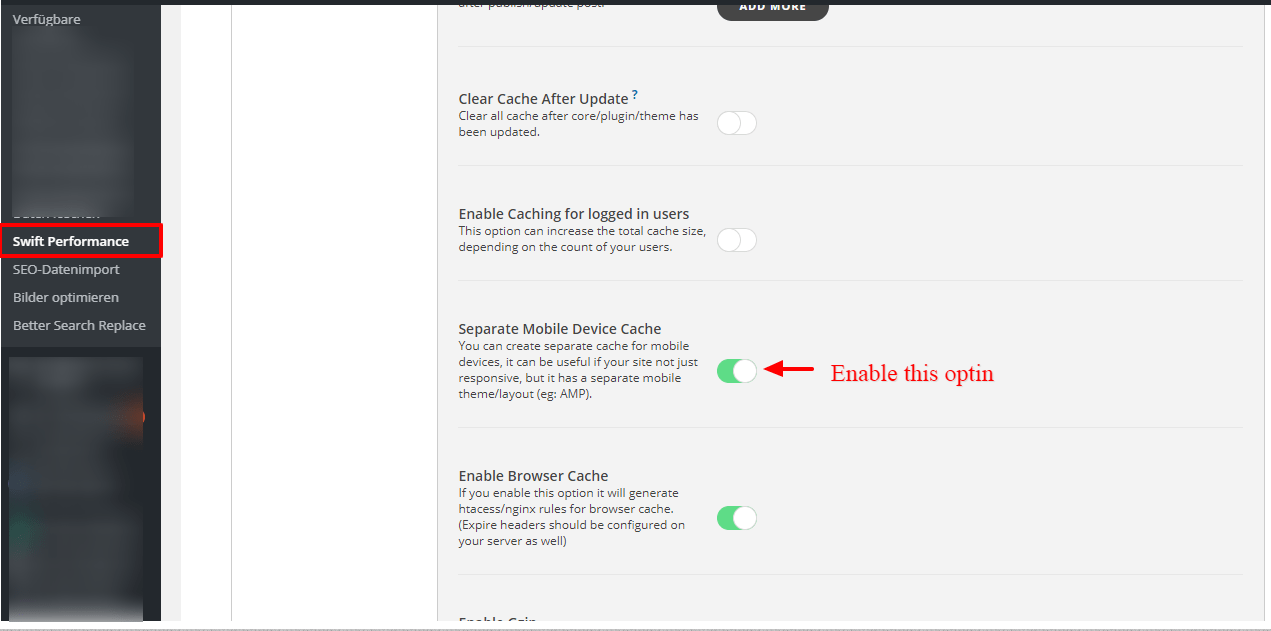
Once you install Swift Performance plugin and activated then follow these steps:
1. Go to WordPress Admin Area -> Swift Performance -> Settings -> Caching -> Separate Mobile Device Cache
2. Separate Mobile Device Cache: Once you select this option Swift Performance will create separate cache file for mobile devices.
3. Click on the Save change button.
Once you install WP-Optimize – Clean, Compress, Cache plugin and activated then follow these steps:
1. Go to WordPress Admin Area -> Settings -> WP Optimize -> Cache -> Check this “Generate separate files for mobile devices” option.
3. Click on the Save change button.
That’s it for this tutorial!
We hope it helped you. If you have any feedback or questions, then please share them in the comments section below.
If you want to add an AWeber form in AMP then first you need to…
Webpushr is the fastest growing web push notifications platform that marketers love & developers rely…
Follow these steps to add Adobe Analytics in AMP Step 1: Go to WordPress Admin Area -> AMP…
Core Web Vitals are the subset of Web Vitals that apply to all web pages,…
The following reasons can be shown for non-indexing. Server error (5xx) Your server returned a 500-level…
We have added the Google Analytics 4 ( GA 4 ) integration in AMPforWP v1.0.80.…