How To Implement The GDPR in AMP

The General Data Protection Regulation in EU law on data protection and privacy for all individuals within the European Union and the European Economic Area.

Once you install and activate our AMPforWP plugin then we will have these two options

  1. Basic Setup View
  2. Advance Setup View

1. Basic Setup View

  • If you are using Basic Setup View then you need to choose privacy settings and click on Choose button like below the screenshot.

  • GDPR – Once you enable GDPR option the General Data Protection Regulation in EU law on data protection and privacy for all individuals within the European Union and the European Economic Area.

2. Advance Setup View

If you are using Advance Setup View then you need to follow the below steps.

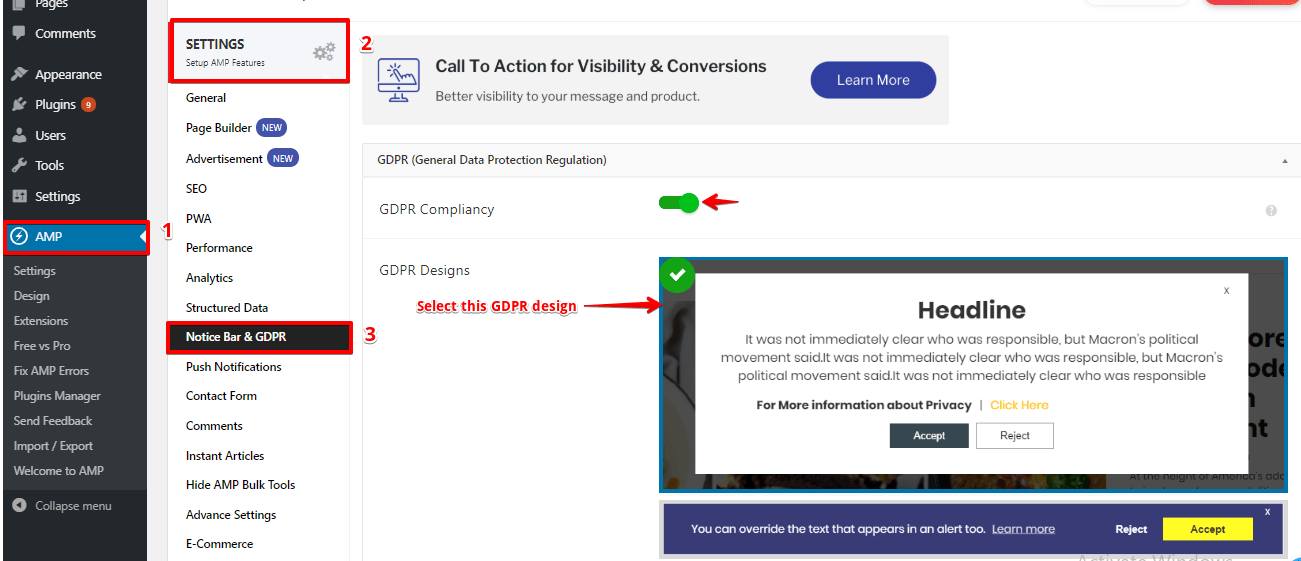
1. Go to the WordPress Admin Area -> AMP Option Panel -> Notice bar & GDPR option and enable the GDPR Compliancy option.

2. GDPR Designs: In this option, you need to select any one of the design.

Scroll down a little to see this option

3. Once you select the first design this option will appear like the below screenshot.

  • Headline Text: In this field, you can enter the text for of Headline.
  • Message to Visitor: In this option, you can write the message that you want to share with the audience.
  • Accept Button Text: In this field, you can enter the text for of Accept Button.
  • Reject Button Text: In this field, you can enter the text for of Reject Button
  • Settings Button Text: In this field, you can enter the text for Settings Button.
  • For More information: Text before the privacy page button.
  • Select the Privacy Page: In this option, you can Select the Privacy Page to display.
  • Privacy Page Button Text: In this field, you can enter the text for Privacy Page Button.

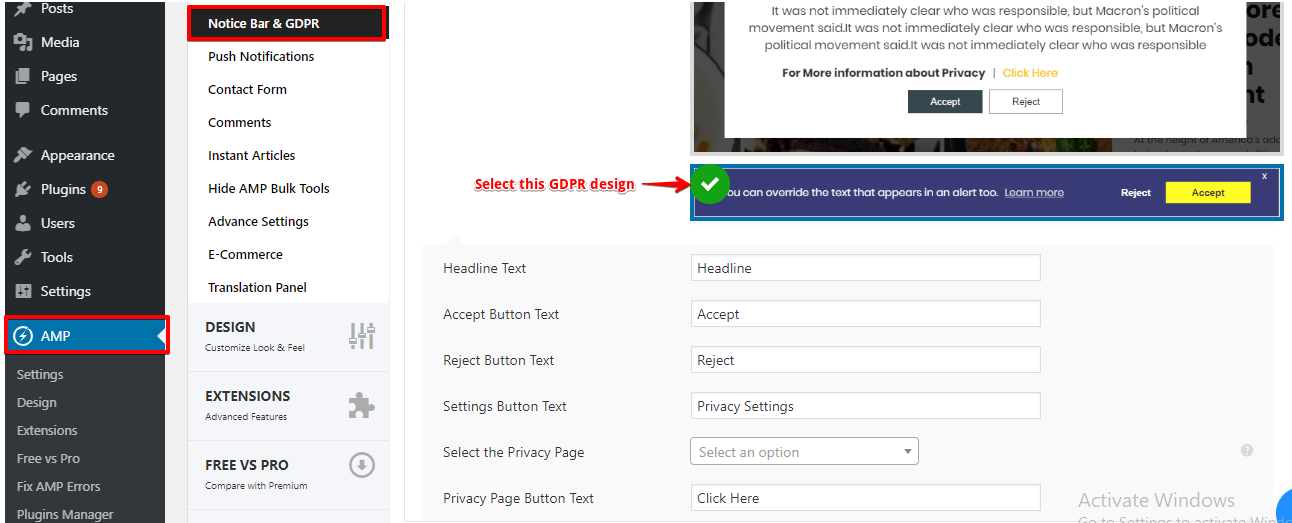
In GDPR design if you select the second design this option will appear like the below screenshot.

  • Headline Text: In this field, you can enter the text for of Headline.
  • Accept Button Text: In this field, you can enter the text for of Accept Button.
  • Reject Button Text: In this field, you can enter the text for of Reject Button
  • Settings Button Text: In this field, you can enter the text for Settings Button.
  • Select the Privacy Page: In this option, you can Select the Privacy Page to display.
  • Privacy Page Button Text: In this field, you can enter the text for Privacy Page Button.

Note:Before you enable the GDPR Compliancy, please make sure the site is HTTPS.

That’s it for this tutorial!

We hope it helped you. If you have any feedback or questions, then please share them in the comments section below.

Share
Published by
Kaleem

How to create an AWeber form in AMP

If you want to add an AWeber form in AMP then first you need to…

3 years ago

How to setup webpushr notification in AMP

Webpushr is the fastest growing web push notifications platform that marketers love & developers rely…

3 years ago

How to add Adobe Analytics in AMP

Follow these steps to add Adobe Analytics in AMP Step 1: Go to WordPress Admin Area -> AMP…

3 years ago

What is the CWV plugin all about

Core Web Vitals are the subset of Web Vitals that apply to all web pages,…

4 years ago

How to fix “Alternate page with proper canonical tag” Page Index issue in Google Search Console

The following reasons can be shown for non-indexing. Server error (5xx) Your server returned a 500-level…

4 years ago

Google Analytics ( GA4 ) integration in AMPforWP

We have added the Google Analytics 4 ( GA 4 ) integration in AMPforWP v1.0.80.…

4 years ago