This tutorial will guide you to configure Instant Articles (FBIA) with AMPforWP plugin.
Follow the Step for Instant Articles:
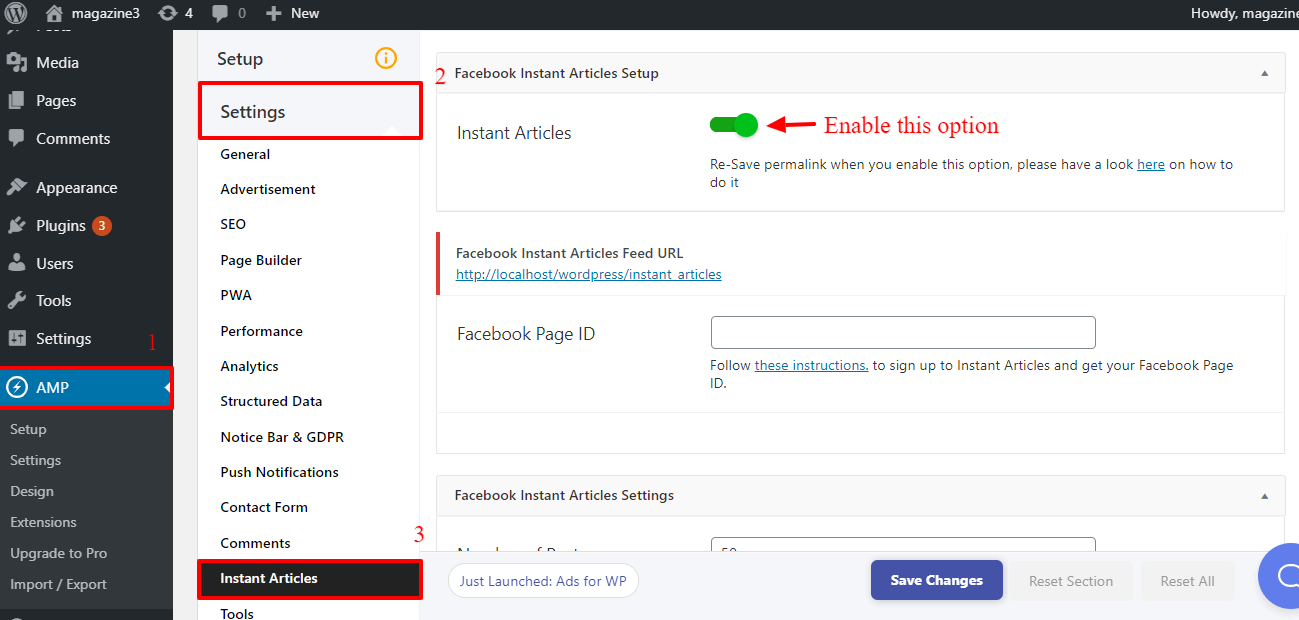
Step 1 – From the dashboard we go to left hand side in Menu bar go to AMP option panel -> Click on Settings Option -> Ones you enable this Instant Articles option it will be display all option of Facebook Instant Articles Settings on the screen.
Step 2 – In this Facebook Instant Articles Feed URL option insert Feed URL.
Step 3 – In this option you need to insert Your Facebook Page ID. Follow These instructions. to sign up to Instant Articles and get your Facebook Page ID.
Then Submit this feed URL to instant articles https://www.facebook.com/instant_articles/signup.
Step 4 – Click on the “Save Changes” button.
Important Notes :
1. Facebook Instant Articles Settings in this option you can add extra setting related Instant Articles likes Number of Posts, Author Meta, Author Bio, Related Articles.
3. Facebook Instant Articles Settings ->Number of Posts in this option you can add number posts like 500 , 1000, 10000. if you leave this empty it will generate all post(500).
4. If you enable Author Meta option are displayed at the top of the article like author of your instant article.
5. Ones you enable Author Bio option it will be display image of author, Name of author and description about author at the end of the instant article.
6. Enable Related Articles option it will display related articles show at the bottom of the instant articles.
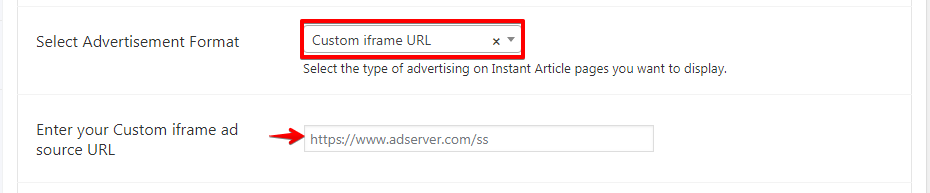
4.When you click on Select Advertisement Format option list will be show. select the type of advertisement on instant article page you want to display.
5. Ones you select the Facebook Audience Network you need to add Audience Network Placement ID. By using Facebook Audience Network you can generate Placement IDs and integrate Audience Network ads within your Instant Articles.
6. Select the Custom iframe URl add Custom iframe ad source URL.
7. Select the Custom Embed Code option. By using this option you can add your Custom Embed ad code.
8. When you select this option list will be show. You can select how frequently you’d like ads to appear in your article by changing the ad density. If nothing is specified, the ad density will default to one ad per 250 words.
If you want to add Analytics in FBIA, then enable the “Analytics option” from AMP options Panel-> Settings-> Instant Articles ->Facebook Instant Articles Settings.
Go to AMP options Panel -> Settings -> Instant Articles -> Facebook Instant Articles Settings -> Crawler Ingestion.
If it is Facebook Article have Instant Articles then it will automatically add meta tag (ia:markup_url) .
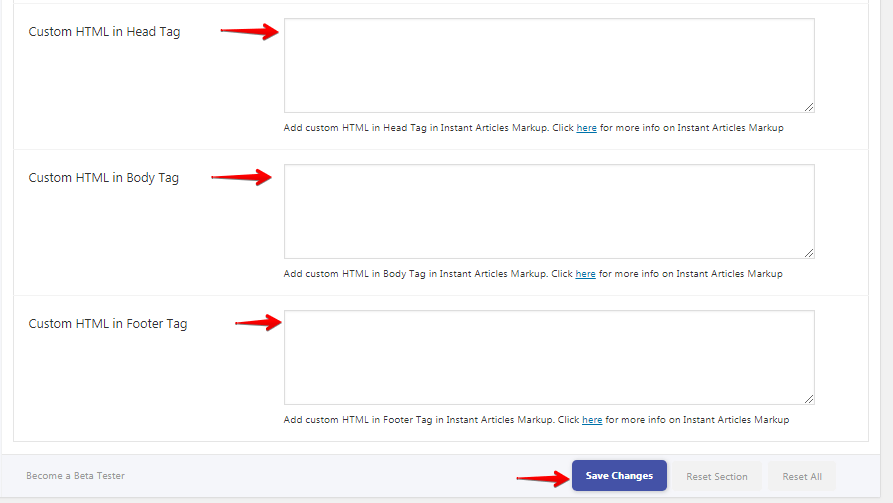
Go to AMP options Panel -> Settings -> Instant Articles -> Facebook Instant Articles Settings -> Custom HTML in Head Tag.
1.In this option you can Add custom HTML in Head , Body and Footer section in Instant Articles.
once you completed all configuration click on the Save Changes button.
That’s it for this tutorial!
We hope it helped you. If you have any feedback or questions, then please share them in the comments section below.
If you want to add an AWeber form in AMP then first you need to…
Webpushr is the fastest growing web push notifications platform that marketers love & developers rely…
Follow these steps to add Adobe Analytics in AMP Step 1: Go to WordPress Admin Area -> AMP…
Core Web Vitals are the subset of Web Vitals that apply to all web pages,…
The following reasons can be shown for non-indexing. Server error (5xx) Your server returned a 500-level…
We have added the Google Analytics 4 ( GA 4 ) integration in AMPforWP v1.0.80.…